Tutorial - How to flash custom lollipop kernel on Zenfone 5 and Zenfone 6. With Custom Kernel you can improve your battery life and device performance on any ASUS Zenfone device. This kernel will work on stock Lollipop firmware 3.23.40.52, 3.23.40.60, 3.24.40.78 or 3.24.40.87. This method tested with 3.24.40.78 WW firmware. And do not try this kernel with Kitkat firmware. Note:- This tutorial will void your warranty and Do it with own risk. I am not responsible for any kind of the damage.
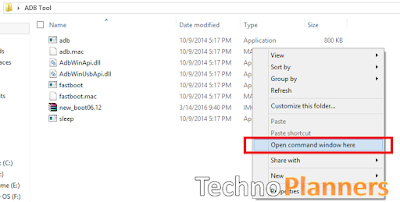
Step 3. Open CMD Windows from ADB tool folder. By using hold Shift + Right Mouse button and select open windows command here.
Step 4. Power off your device and Reboot it in droidboot mode using Power + Volume Up button.
Step 5. Once droidboot open, Connect your device with PC using data cable.
Step 6. Now Write below cmd in commend window and hit enter.
Step 7. Once it shown done, Reboot your device.
Congratulation, Now you have a custom kernel for your device. You can check your device CPU cores working or not using the CPU Status. Attention! May be a little incompatible with 1 Gb RAM versions and Xposed. Random reboots due to long phone calls with enabled DT2W still have NOT fixed yet. Temporary solution- TURN OFF dt2w in Zenmotion before long calls making. If you detect any issue or problem in our tutorial, please drop your comment we will reply as soon as possible. Also check out How to Flash Xposed for Zenfone 5 and Zenfone 6 Please share this tutorial it help us to grow.
Requirement
- Rooted Zenfone (Also check out One Click Root for Zenfone)
- Zenfone 5 or Zenfone 6
- ADB Fastboot tool
- Windows PC (Download all files from end of post)
Features of Custom Kernel
- Added SWAP support
- Compiled with GCC 4.9 with fast optimization
- Random Linux kernel generator
- DT2W support
- Kernel Virtual machine for Intel support
- Added support of init.d. Scripts
- Added support of exFAT file system for external SD card.
- Add more governors and I/O schedulers
- Support joysticks
- Ultra kernel same page merging(UKSM) a place of KSM
- Processor works in 1 CPU per module mode a place of stock 2 CPU per module
- Hot-plug for all governors
- Under-clock to 667 MHz.
- Add more TCP IPv4 congestion algorithms (May change via Trickster-mod or Kernel Auditor apps)
- F2FS support
- ZRAM is disabled for older versions.
- Added CD emulating feature
Battery Saving Proof
This screenshot taking to proof this kernel actually helps to save battery. Now the question is how it saves the battery life and give long life battery backup. When device screen is suspended that automatically disable 2 cores from 4 cores processor and device work on 2 cores in suspend time.How to flash Custom Kernel Zenfone 5/6
Step 1, Download ADB Tool
First, you have to download ADB tool from end of post and extract it on your desktop using WinRAR Tool.
Step 2. Download Custom Kernel
Now, download custom kernel and place image file in extracting adb tool folder.Step 3. Open CMD Windows from ADB tool folder. By using hold Shift + Right Mouse button and select open windows command here.
Step 4. Power off your device and Reboot it in droidboot mode using Power + Volume Up button.
Step 5. Once droidboot open, Connect your device with PC using data cable.
Step 6. Now Write below cmd in commend window and hit enter.
fastboot flash boot new_boot06.12.img
Step 7. Once it shown done, Reboot your device.
Download here
ADB Tool - http://bit.ly/1QUEyrx
Kernel - http://bit.ly/1QUEAj8
Congratulation, Now you have a custom kernel for your device. You can check your device CPU cores working or not using the CPU Status. Attention! May be a little incompatible with 1 Gb RAM versions and Xposed. Random reboots due to long phone calls with enabled DT2W still have NOT fixed yet. Temporary solution- TURN OFF dt2w in Zenmotion before long calls making. If you detect any issue or problem in our tutorial, please drop your comment we will reply as soon as possible. Also check out How to Flash Xposed for Zenfone 5 and Zenfone 6 Please share this tutorial it help us to grow.
![[Battery Saver] Custom Lollipop Kernel on Zenfone 5, Zenfone 6 Battery Saving Proof using Custom kernel on Zenfone 5](https://blogger.googleusercontent.com/img/b/R29vZ2xl/AVvXsEg2FPGL4FTciYoToIL6cRLE-8L3xhePMfNovgnu4ss_16bVs3V8GUd3Gx_DT2g00rJnsTGiBmATh9i-AhshnCgQCQdipIYstN9EoBfQKxcX6S3JqEBL7yIuXBKeZXNe2lKbDS4SrkeD1u0/s400/Screenshot_2016-03-19-13-28-02.jpg)


Don't we need to unblock bootloader first?
ReplyDeleteIn root process, Bootloader automatically unlocked. So, you can flash custom Lollipop kernel on your Zenfone 5 or Zenfone 6 without unlocking the Bootloader.
DeleteThanks for clarification, anyways can u please upload battery stats screenshots just to check how mhch improvement in battery life.?
DeleteThis Screenshot was taken by me from Zenfone 5 which running on custom lollipop kernel
DeleteStill not clear from battery screenshot, don't even understand how much sot we get from full charge with heavy to moderate use.
DeleteHello i have done according to your steps u provided but after reboot i getting usb kind of logo. What to do please help. 😑
DeleteFlash Stock firmware on your device
DeleteI have done thanks, but y i m n5 able ro use 5his kernal? What's wrong?
DeleteIts working with cynogen os
ReplyDeleteThis comment has been removed by the author.
DeleteThis comment has been removed by the author.
DeleteEh, seriously?!
DeleteCM13 or CM12.1?